In Third Grade we are finishing up our pottery project, focusing on coils. We talked about the artwork of the Pueblo Native Americans and also discussed the different functions pottery takes within their daily lives. We looked at the geometric designs painted on the surfaces of the vessels and also we watched a video showing potter Maria Martinez at work in her house, the students really enjoyed watching Maria working and learning more about her style. Here is the video link that I show students during class, it is a two part documentary on Maria.
After the video, we discussed how we will be creating our coil pots. There are many important steps to take in order for the pots to be successful. We discussed the process of scratching and slipping our clay together, this is where you take two pieces of clay and scratch them like Velcro and add water to help it stick together.
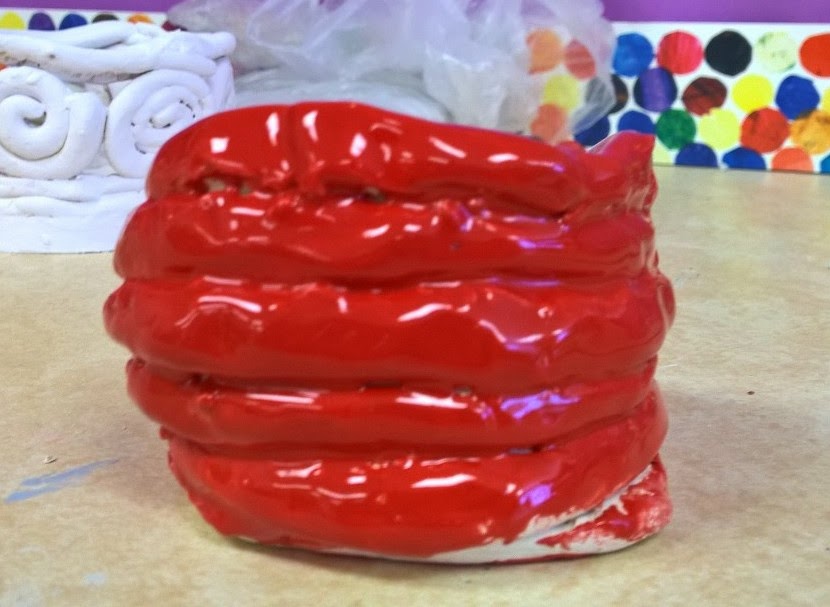
After they were fired in the kiln, the students learned about the glazing process and the steps needed to glaze their pottery. Students picked out one color for their pots and applied it in three layers.
Here are our wonderful results!
Friday, February 27, 2015
Wednesday, February 25, 2015
Elementary School Banner
This year at Rousseau Elementary we created our annual Elementary banner. Our wonderful Fourth Grade students volunteered some of their class time to work on painting our design. Each time we have done the banner, I have tried to tie it in to a project the students have learned about previously in the year. We selected our Mola project to use as our banner's design.
It took all three Fourth Grade classes about a week to finish the painting. They enjoyed being able to see the project start from the drawing and go to the final painted product. It really did turn out beautifully, lots of bright and bold colors standing out against the black background.
Fifth Grade Chihuly Bowls
In Fifth Grade, we looked at the works by artist Dale Chihuly. We discussed how his work looks abstracted and has form. We watched a video that documented works that Chihuly has in Seattle, Washington in a botanical garden. We also watched a video where some glass artists showed the glass blowing process. The students loved looking at all of his intricate pieces and the colors, they also enjoyed seeing how glass can be created in different shapes and sizes.
We took our learning and created our own Chihuly inspired bowl. First, we took a ball of newspaper about the size of a softball and taped it so the form was held. Then, we rolled clay into a slab and draped the clay over the newspaper ball. Our hands were used as tools to shape the edges of the clay. We let the clay dry over the newspaper and then they were fired. The students were then able to glaze them however they wanted, patterns, one color, etc...
Here are some of the end results, they were all so beautiful!
Friday, January 2, 2015
Second Grade Lego Portrait
In Second Grade, we finished discussing Portrait Artwork and viewing various types of Portraiture. We took our learned information and applied it to our own Portrait Artwork. We created a Portrait drawing of a Lego Person. It could be any Lego person the Artist desired.
Stencils were made available if students chose to use one, the Lego outline can be challenging and frustrating for some kiddos to create. While others chose to challenge themselves and create their Lego outline free-hand.
We used crayons to color in our Lego people, some chose to color the background while others left it blank. Leaving the emphasis on their Lego person.
First Grade Abstract Kandinsky Painting
In First Grade, we finished discussing the Artwork of Kandinsky. We learned that he loved to put shapes in his Artwork and felt that Art did not have to show one specific thing, it could be Abstract. We discussed what Abstract means in Artworks as well as how colors can be used to show emotion within the Art.
After looking at some of Kandinsky's works, we began creating our own Abstract Art inspired by his paintings. First Graders selected one shape or a variety of shapes and then outlined them with Oil Pastels. We then learned about Watercolor and how it is different than other paints, it needs to be light in appearance and needs to be made wet to work with. The Oil Pastel resists the paint and allows the different colors to show through.
Here are some of our Abstract paintings:
Kindergarten Gingerbread Man
In Kindergarten, our special Winter project was creating our very own Gingerbread Man out of clay. First, we read the book Gingerbread Baby which was enjoyed by all, then we started off on creating our own Gingerbread Man. The students received a pre-rolled slab of clay and then a stencil in the shape of a Gingerbread Man. They traced the stencil into the clay and cut out their figure. Then, details were added- buttons, mouth, nose...
To add color, we used Oil Pastels-any color they wanted, and then Brown watered down tempera paint. This gave them the 'cookie' look. The students had a lot of fun working with the clay and seeing their Gingerbread people come to life.
Second Grade Pointillism Landscape
In Second grade we are finishing our project where we explored the painting technique of Pointillism. We discussed the Artist Georges Seurat and his paintings, looking at his use of colors and Pointillism.
We learned about the different parts of a Landscape Artwork- Foreground, Middle ground, and Background. We created sketches where we used our knowledge of the Landscape parts and created our own Landscapes.
After discussing the parts of a Landscape, we started looking at Georges Seurat and his paintings- focusing on his use of Pointillism. We practiced Pointillism by creating a color wheel and using markers to give the illusion of the colors mixing to create the desired color. In Pointillism, the painter places colors close together to trick the eye into mixing them.
Here are some of our color wheel practices:
Here is our final Pointillism Landscape:
Subscribe to:
Posts (Atom)